Thursday, July 5, 2012

Curried Carrot Coconut Soup


Hi, how are you?  I hope you are all having a wonderful summer.  Things have certainly been busy on our end.  We have spent a lot of time analyzing food in this house, something I recommend everyone do once in a while.  It is easy for all of us to lose sight of where our food comes from and what our bodies actually need.  Convenience often wins out over everything else, especially considering how busy we all are.  When time is a factor, sometimes it's difficult to hand make everything.  The nice thing, though, is that every once in a while, convenience collides with the handmade, resulting in simple, healthy, homemade recipes.  The kind that we allow to slip into our regular rotation, never sure when it actually arrived. 


Which brings me to carrots.  I know that soup isn't always a go-to when the summer months arrive, but this particular soup tastes just as delicious at room temperature as it does heated up.  It has just the right blend of spices and vegetables, with a nice hint of coconut blended in.  This soup is a delightful addition to any meal, and in fact is a great appetizer to serve at a summer dinner party.  Or just make it when you're craving something with coconut.  Or carrot.


And since I know that to most of you, soup sounds horrible right now (since it's over 100 degrees at your house), here is a bit of inspiration to get into the Summer cooking spirit.  Or at least to admire a nice view, since I am rarely motivated to go anywhere near a stove when it's hot.  Or at the very least, to wish that you lived in San Luis Obispo rather than in your own town right now.  These shots are from our recent drive through the San Luis Obispo area.  I particularly like Bailey's fascination with the ground...I'm pretty sure she was looking at a candy wrapper.


Curried Carrot Coconut Soup
Serves 2-3 as a main course, 5-7 as an appetizer

1 1/4 teaspoons curry powder
1/2 teaspoon garam masala
1/4 teaspoon cinnamon
1/2 teaspoon freshly ground ginger
1 tablespoon oil (olive oil or melted butter)
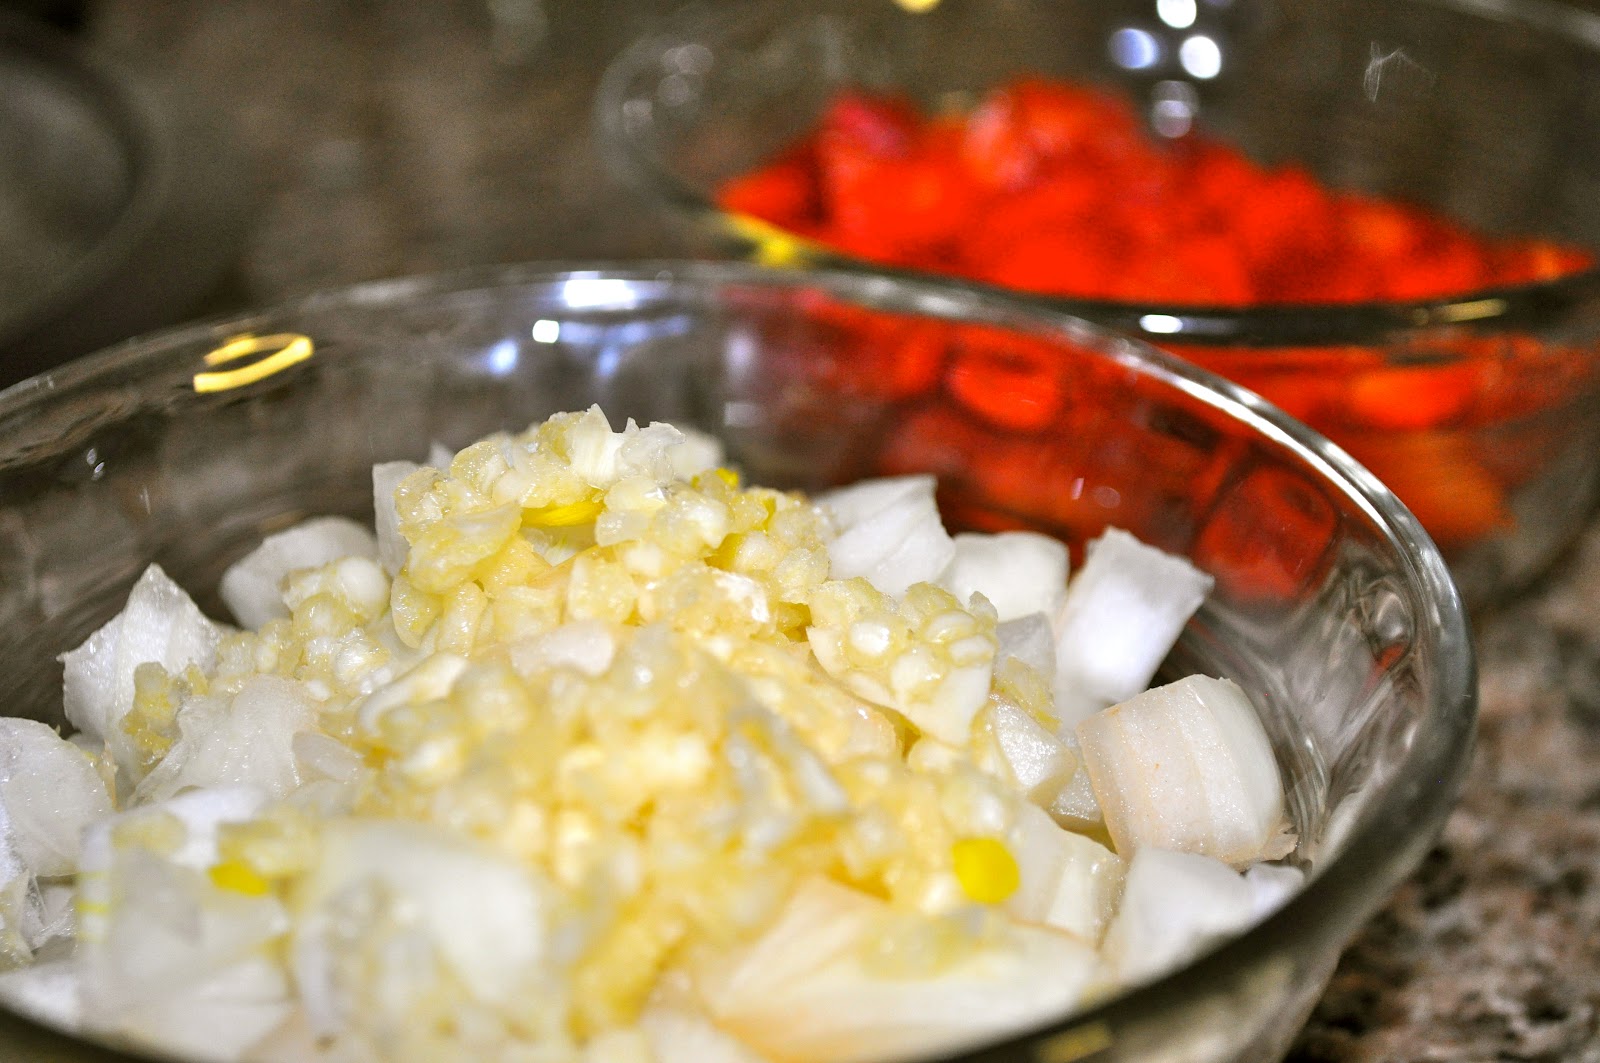
3 large carrots, coarsely chopped
1 onion, diced
1 3/4 cups vegetable broth
1/2 to 1 can coconut milk
Salt to taste

Add spices and oil to a medium-sized sauce pan and saute over medium-low heat until fragrant, 2-3 minutes.  Add onions and cook, stirring until translucent, 4-5 minutes.  Add carrots and saute 2-3 minutes more.  Add vegetable broth and simmer until carrots are soft, about 5 minutes more.  Blend soup until smooth, using either a blender or an emersion blender.  Return soup to pot and stir in coconut milk until well blended.  This soup can be served at room temperature (which is a nice summer option).  

*Note on coconut milk: you can use up to a full can but taste the soup as you add to make sure it doesn't become too rich for your taste.

Monday, May 28, 2012

Cucumber Salad with Feta and Peppers


Well, hello there.  After what can only be described as an incredibly long and abrupt hiatus, I have returned.  And my excuse?  Well, I suppose the best way to describe it is: Life Happened.  We were doing just fine, walking (often running) down the path of Life, smelling the occasional flower, when WHAM, we got nocked in the heads by a large and uncomfortable dose of Reality. In effect, my darling spouse was diagnosed with a rather awful illness, and we are still finding our way out of the initial whirlwind of diagnosis and clawing our way firmly back onto the ground of living - nay, thriving.


It is amazing how easy it is to take health for granted (so long as you have it).  It is more amazing, still, how fully you fight for it once it is lost.  Ours is not a family who meekly follows the orders of a doctor.  Ours is a family that considers the entire balance: food, stress, spirituality, sleep, etc.  We look at the whole body, and we attempt to tackle illness from all angles, eliminating the problem, not merely treating the symptoms.


Which brings me to food.  While food has always been carefully and lovingly prepared in our home, it has now become an obsessively creative and precisely considered endeavor.  While I used to consider myself a fairly openminded chef, I am suddenly using ingredients I had never before considered (celery root, anyone?), and truly enjoying the chance to bring new flavors into my kitchen.  Every dish has become a study of balance, with a focus on simple, quality ingredients.


With every dietary restriction, there comes the option to despair, or the option to create.  While it takes significantly more work to find the good in restrictions, I have found this to be a refreshing challenge: one in which I am embracing new ideas, new techniques, and new ingredients.  The recipe I have for you today involves none of these novel concepts.  In fact, it is incredibly simple and you may very well have every one of these ingredients in your home right now.  What I love about this recipe, however, is it's simplicity.  And it's versatility.  Herein lies the recipe for a salad all by itself, or a dressing to be added to any number of other dishes.  So I encourage you to consider it a jumping off place, one where you can enjoy a few simple flavors, or add them to another dish.  Oh, and it will only take a few moments to throw together.


Cucumber Salad with Feta and Peppers
Serves 2-3 (as a main dish) 4-6 (as a side dish)

A note on vinegar: we are blessed with a lovely little store that sells fantastic flavored balsamic vinegars.  In this case, I used a cranberry-pear balsamic and it worked wonderfully.  If you don't have access to similar flavors, feel free to use any kind of acid (including regular balsamic or white balsamic vinegar, or even lemon juice) to give this salad a kick.

1 large or 3-4 small thin-skinned cucumbers (such as English or Persian cucumbers), preferably organic
1 medium red-bell pepper, preferably organic
3 tablespoons extra-virgin olive oil
1-2 tablespoons vinegar
1/3 cup crumbled feta cheese
Fresh ground pepper

Wash and chop cucumber (leaving skin on), into a half-inch dice.  Wash and dice red bell pepper, removing seeds, and cutting into quarter-inch pieces.  Place the chopped vegetables into a medium-sized bowl.

In a small bowl, mix olive oil, vinegar, and freshly ground black pepper, whisking until the mixture becomes homogenous.  Drizzle olive oil mixture over vegetables, and toss until evenly coated.  Mix in feta cheese.  Refrigerate at least two hours (or up to three days) before serving, to allow flavors to blend.


Thursday, April 26, 2012

Why I Cook and a New Cookbook


I know that many of you are warriors in your own kitchen.  You experiment, you play, you conquer.  You are the ones who can't wait to cook with new ingredients, use new techniques.  You are always excited to try a new recipe, and you are as thrilled by your friends' culinary successes as you are with your own.  After all, they will surely share the recipe (as well as the food) with you.  But there are also people who don't understand.  Some of them are afraid -- they feel unsure of their abilities in the kitchen.  Some of them don't feel like they have the time.  Some of them don't really want to.  Some just prefer the convenience of store-bought foods.  After all, why wait four hours for ice-cream when you can go get it now?  


That being said, I would like to tell you why I cook.  Hopefully, it will encourage you if you have lost your inspiration, or have been too afraid to try.  Maybe I can help you overcome your fear of that candy thermometer.  Maybe it will just give you some insight into me.  There are always the basic reasons: it tastes better, it (often) costs less, you can control the ingredients that go into your food.  But there are deeper reasons, the ones that move the making of food from a hobby to something that is…part of me.  


The first of these reasons is that I take pride in the quality of food I feed my family and friends.  It's not just about tasting good, it's about knowing that I took the time to choose quality ingredients.  It's about knowing that I put my self into that food.  It's about knowing that I am serving them food that will nourish their bodies as well as their spirits.  Food is a powerful thing because it can trigger emotions, it can comfort us, and the flavors we eat are tied to our memories.  So I sincerely hope that the food I feed my family and friends is food that fills their bellies, comforts them, and reminds them of good times.


I also enjoy the artistry.  Creativity comes in a plethora of forms with the use of a variety of media, including pencils, paint, clay, cloth, and yes, even food.  The artistry inherent in a perfectly risen loaf of bread or in the flakiness of the crust of a summer peach pie is just as satisfying as the creation of an exquisite painting -- at least to the artist.  Edible art is not to be ignored, and for those of us who cook with the passion of a creative spirit, we are all artists and food is our medium.  I hope you never once doubt the creativity of your culinary expeditions.  I promise that I won't.


 And finally, knowing I can make something like bread or yogurt is freeing.  Let me explain: as much as there is a great convenience to purchasing food items in the store, this convenience also manages to inhibit you.  It renders you dependent on a store (that may have just run out of the item you really needed), and it leaves you with no backup plan.  Now there is absolutely nothing wrong with purchasing the items in your pantry.  But there is something so liberating and exciting about knowing that YOU made those items yourself.  I don't have to worry about whether or not the grocery store ran out of yogurt because I know how to make it from scratch.  Knowing that the bags of granola, loaves of bread, cheese, and jars of jam in my kitchen were all made right here in my kitchen makes me feel invincible.  I could make anything.  It also ties me to the roots of people who have made these things at home for generations.  It gives me this feeling that I have not forgotten that history, and that I am in fact part of it.


Which now brings me to that new book.  I stumbled across a fantastic new cookbook, by Alana Chernila, called The Homemade Pantry: 101 Foods You Can Stop Buying and Start Making.  Now I don't often buy cookbooks, because I don't have the space.  But I couldn't resist with this one.  Alana makes home cooking accessible in a fantastically approachable way.  She also encourages her readers to branch out and make things at home that they would never usually consider.  Homemade ketchup anyone?  You may have heard of Alana before.  She writes a lovely blog called Eating From the Ground Up, where she writes about food, family, and all the stuff in between.    


What I really love about Alana's new book is that she shares her self in it.  It's full of stories about her family, stories about her recipes, and she manages to become your friend after a very short introduction.  For those of you who are afraid of anything shy of boiling water, or even if you are a seasoned cook who just needs a little inspiration or a little push to try something new, this is your book.  Alana will take you on a ride, encouraging you to try projects that are as simple as making pudding or as complex as making cheeses, or canning your own produce.  I find that there is something for every cook between those pages, and I am really looking forward to trying all of her recipes.  I hope you will, too. 


Monday, April 16, 2012

Lavender Vanilla Pudding


I'm pretty sure the last time I ate any food that whispered of a gelatenous quality was when I was six years old at a birthday party and one of the desserts was red Jell-O.  While I was admiring the ruby red color and jiggleability (it's a word) of the cube on my plate, one of the other party-goers took great pleasure in informing the table that Jell-O was made from cow and horse hooves.  Being a rather mature seven-year-old (and thus my senior), she also felt the need to tell us that they take the cow and horse hooves from the animals when they are still alive.  And being a wee bit gullible at six, I believed her.  Needless to say, that was the end of my Jell-O-eating childhood.


Unfortunately for my mother, my logic had always been supported by texture rather than fact, and so I rarely touched any other food with similar traits.  But now being nostalgic (and a fair bit less gullible then my six-year-old self), I have been toying recently with the idea of home-made puddings.  After all, they are NOT Jell-O (I still won't eat it...even to this day.  I guess nostalgia only takes you so far).  But pudding seemed like a worthy cause.  I will admit - the boxed varieties of pudding still frighten me with their bizarre colors and strange "flavors" (since when is blueberry flavor derived by anything but blueberries?).  And so I set out to try making my own.


After all, if it's homemade, then at least I know what the pudding is made of.  And it just so happens that I found a girl after my own heart.  She loves making everything from scratch.  No out-of-the-box pudding in her house.  And she just so happened to have a vanilla pudding that was begging to be made.  But it was lacking something.  Don't get me wrong - I am a vanilla girl through and through.  It's just that there is a lovely bunch of lavender growing outside my door, and it is so much fun to be able to actually use what you grow.  And it just so happens that honey-lavender ice cream is my absolute favorite.  And pudding is kind of like ice-cream, right?


Lavender Vanilla Pudding
Adapted from The Homemade Pantry
serves 8

4 cups of milk (either whole milk or 2%)
1/2 cup sugar
1/4 teaspoon salt
5-6 sprigs of lavender (preferably organic)
1/2 cup cornstarch
1/2 teaspoon vanilla

In a heavy-botomed saucepan, heat 3 cups of milk, sugar, salt, and lavender sprigs on medium-low heat.  Stir frequently.

In the meantime, mix the remaining 1 cup of cold milk with the cornstarch, whisking until there are no lumps.  When the heated mixture begins to steam, remove the lavender sprigs, pressing any remaining moisture out of them into the pot before discarding.  Add the milk-cornstarch mixture and stir constantly, increasing the heat to medium-high.  Cook the mixture until it begins to bubble, and turn it down to low, stirring constantly until it begins to thicken and will coat the back of a spoon, 5-7 minutes.    Remove mixture from heat and whisk in vanilla.

Pour pudding mixture into individual serving dishes (or into one large dish) and allow to cool in the fridge for at least two hours before serving.  The pudding will set as it cools.  Garnish with lavender blossoms and a drizzle of honey before serving.


Friday, April 6, 2012

David Leite's Chocolate Chip Cookies


I have a confession to make.  While most people's baking Everest is a souffle, or a loaf of ciabatta, or that perfectly seared piece of tuna, my baking Everest is the Chocolate Chip Cookie.  Yup, you heard that right.  It's not to say that I haven't made them before.  In fact, I've baked dozens hundreds of chocolate chip cookies in my life.  It's the fact that every time I bake a batch, it leaves me feeling like there's room for improvement.  That one came out too dry, that other one...not chewy enough.  That last batch?  The chocolate-to-cookie ratio was wrong.  And don't forget the batch with the truly forgettable cookie flavor.


I have tweaked the original Tollhouse recipe mercilessly, and I have liked some variations better than others.  I have melted, softened, and beaten butter.  I have altered egg yolk to egg white ratios.  I have tweaked the brown and white sugar ratios.  I have even tried different types of chocolate.  And while some of these cookies have been undeniably delicious, I have still felt like I haven't found "the one".  So any time I stumble across a promising recipe, I feel obligated to try it.  I swear.  I could be looking for a recipe for stir-fried vegetables, and oops, look, there's a chocolate chip cookie recipe.  Well, of course it has to be made right now!


And in this quest, I have tried many a recipe that claims to have "figured it all out" and has finally mastered this oh-so-elusive perfection in a cookie.  And undeniably, I have been disappointed.  Now don't get me wrong - many of these recipes are fabulous.  They are just missing...something.  So when I stumbled across the 2008 New York Times recipe, I figured I would give it a try.


I had no idea that there were others, just like me, on a quest to perfect the chocolate chip cookie.  But David Leite convinced me of that as I read this article that went on for three pages about how he interviewed great bakers and gathered there secrets together to develop the very best chocolate chip cookie.  Now, I have to say this recipe is significantly more pretentious than I think a chocolate chip cookie should be.  I mean, there are two types of flour for goodness sake.  That being said, I had to try.  After all, the path to the top of Everest is strewn with challenges and wrong turns.


So with a culinary patience that I normally only reserve for the very best of bread doughs, I made this cookie dough and let it sit.  In the fridge.  For THIRTY-SIX hours.  Sigh.  And the result?  As close to perfection as I have ever come in a cookie.  They were crispy on the outside, soft on the inside, with a chewy, caramel-like middle.  They tasted amazing just out of the oven, but also tasted amazing the next day.  These cookies take a significant amount of patience, but if you have the time, they are completely worth it.

Chocolate Chip Cookies
Adapted from David Leite via the New York Times

Note on Chocolate: the original recipe called for 1 1/4 pounds of bittersweet chocolate discs.  I personally prefer less chocolate than that and only added a 1/2 pound (8 ounces), although I could see increasing that to 12 ounces.  I also prefer semisweet chocolate to bittersweet chocolate, and chose bars (chopped) rather than discs of chocolate.


2 cups minus 2 tablespoons (8 1/2 ounces) cake flour
1 2/3 cups (8 1/2 ounces) bread flour
1 1/4 teaspoons baking soda
1 1/2 teaspoons baking powder
1 1/2 teaspoons coarse salt
2 1/2 sticks (1 1/4 cups) unsalted butter
1 1/4 cups light brown sugar
1 cup granulated sugar
2 large eggs
1 tablespoon vanilla extract
1/2  or up to 1 1/4 pounds bittersweet chocolate disks or fèves, at least 60 percent cacao content (see note)
Sea salt

Sift flours, baking soda, baking powder and salt into a bowl. Set aside. Using a mixer fitted with paddle attachment, cream butter and sugars together until light in color, about 5 minutes. Add eggs, one at a time, mixing well after each addition. Stir in the vanilla. Reduce speed to low, add dry ingredients and mix until just combined, 5 to 10 seconds. Drop chocolate pieces in and incorporate them without breaking them. Press plastic wrap against dough and refrigerate for 36 hours. Dough may be used in batches, and can be refrigerated for up to 72 hours.

When ready to bake, preheat oven to 350 degrees. Line a baking sheet with parchment paper or a nonstick baking mat. Set aside. Scoop 6 3 1/2-ounce mounds of dough (the size of generous golf balls) onto baking sheet, making sure to turn horizontally any chocolate pieces that are poking up. Sprinkle lightly with sea salt and bake until golden brown but still soft, 18 to 20 minutes. Transfer sheet to a wire rack for 10 minutes, then slip cookies onto another rack to cool a bit more. Repeat with remaining dough, or reserve dough, refrigerated, for baking remaining batches the next day. Eat warm.
Yield: 1 1/2 dozen 5-inch cookies.

Thursday, March 29, 2012

Quinoa Black Bean Burgers


As much as I love cooking, I sometimes fall down a rabbit hole and arrive in The Land of No Ideas.  I don't really like it there.  It's cold, uncomfortable, and I spend waaayy too much time trying to come up with new dinner ideas.  As much as I enjoy experimenting, I fall into cooking patterns just as much as anyone else.  And you can only make (and eat) a frittata so many times before you never want to see another egg in your life.  So when I stumbled across a bag of tri-colored quinoa, I couldn't resist buying it.  I don't use quinoa very often, so it seemed like it would be fun to work with a different grain.  One of the suggestions on the back of the bag was to make veggie burgers, which just intriguing enough.


If you've ever tried to make (or eat) a veggie burger, then you know that there are TONS of different ones out there.  Vegetable, soy, rice, millet, egg, grain, bean, mushroom... The list goes on and on.  Having eaten veggie burgers my whole life, I can guarantee that they have improved in flavor over the last couple of decades.  When I was a kid, they were pretty awful, but now?  Now, most of them are quite delicious (although there is always room for improvement).


And as easy as it is to just buy a package of frozen burgers and cook them, there is a certain appeal in making your own because there is so much more versatility.  You can add (or eliminate) any ingredient you want.  So I encourage to to go ahead and try these out.  They are simple to make and they are begging to be adapted.  You could use different vegetables, add spices, or throw some curry powder in the mix.  Whatever you decide to throw in, I'm sure it will taste fabulous.  The only thing is, you'll have to invite me to dinner.
 

Quinoa Black Bean Burgers
Serves 6-8

Note: while veggie burgers seem inherently simple, there is something incredibly difficult about making them.  They often crumble and fall apart, making the cooking rather perilous.  Upon experimenting, I have found that many cook better if you add a little water to the pan, cover, and allow them to steam for a couple of minutes before browning/frying them.  It allows the burgers cook through and become more stable before the browning.

Olive oil
1 medium red bell pepper, diced
1 small onion, diced small
2 cloves garlic, minced
2 kale leaves, sliced thin
1/2 cup fresh or frozen corn
3 cups cooked quinoa
1 can black beans, drained
1/4 to 1/2 cup sharp cheddar cheese
1 egg, beaten
1/2 cups dried bread crumbs
Salt and pepper to taste

Heat olive oil in a skillet and saute peppers and onions 3-5 minutes.  Add garlic, corn, and sliced kale and continue to cook until soft, 2-3 minutes more.  Remove from heat and combine in a food processor with the black beans, and puree until fine.  In a large bowl, mix black bean mixture, quinoa, beaten egg, cheese, bread crumbs, salt, and pepper.

To cook patties, form and let chill in the freezer for 5-10 minutes.  [Also, see note above] In the meantime, heat skilled with oil and fry patties until browned, 3-4 minutes on each side.  Serve on a bun with your favorite toppings.

Wednesday, March 21, 2012

Almond Tuiles


When I was a little girl, my mom and I would walk down to a local French bakery.  It was always a fun trip, where I would look wonderingly at the breads, cookies, and tarts.  They always looked so perfect, so deliberate.  The beautiful curls of chocolate, the delicately displayed fruit, and the perfectly curved almond tuiles.  We would walk home with a beautiful little pink box full of delightful goodies, and them share them over a cup of tea and juice (in a teacup, of course).


This has always been a wonderful memory, but it had been years since I tried an almond tuile.  So when I stumbled across this recipe, I was excited to see if it would live up to my expectations.  And I have to say, these were surprisingly delicious!  Even better - they are incredibly easy.


Considering how pretentious and almond tuile looks, you would expect there to be a corresponding degree of difficulty in the execution of said cookie.  But no.  These are incredibly simple (as in: one bowl, one whisk, a few ingredients. Done).  The batter is just a tiny bit awkward, but if you have a little faith and push through, it is surprisingly forgiving, resulting in consistently beautiful cookies.     


And you are welcome to leave them flat.  I just can't resist the traditional, curved, tile-shaped cookie.  After all, foods always taste better when in funny shapes.  Everyone knows that.  Look at all the different shapes of pasta, for goodness sake.  So curve away.  You don't really need any special equipment.  Just a rolling pin.  And who doesn't have a rolling pin?


Almond Tuiles
Adapted from Williams-Sonoma Essentials of Baking

1/2 cup cake flour
2/3 cup confectioners' sugar
2 large egg whites
1 teaspoon vanilla extract
1 teaspoon almond extract
1/4 cup butter, melted and cooled slightly
1/2 cup sliced (flaked) almonds

Position rack in the middle of the oven and preheat to 350 degrees F.  Line baking sheets with parchment paper or a silicone baking mat.  

In a large bowl, whisk together flour and confectioners' sugar.  Add egg whites, vanilla, and almond extract, and whisk until smooth, about 2 minutes.  Whisk in melted butter until blended and batter is smooth and shiny.

Using a scant tablespoon of batter for each cookie, form six 3-4 inch rounds on a prepared baking sheet, spreading them with a narrow, thin offset metal spatula and spacing them about three inches apart.  The batter will look translucent and the parchment will show through in some places.  Scatter the cookies with slivered almonds.  Bake cookies until they have a border that is evenly brown, but the center remains light, 6-8 minutes.  

Remove cookies from the oven, and with the help of a thin metal spatula, immediately lift warm cookies from the baking sheet and rest on a rolling pin or wine bottle, making sure they do not touch.  
When cookies are firm and slightly cooled, remove from rolling pin and allow to cool completely on a baking rack.  Repeat with remaining batter.  Store at room temperature in an airtight container for up to two days.  

Makes 18-24 cookies